Training Tip #77 - Recovery (Sprained Ankle) ...
If you tweak your ankle during training, one of the best recovery techniques is to routinely write the letters of the Alphabet with your big toe (both in uppercase and lowercase letters).
One of the worst recovery techniques is to sit at home, resting your ankle with a bag of ice on it ... all while firmly immobilizing it with an ace bandage (a.k.a. RICE)

Note: This recovery technique should only be used if there are no confirmed breaks in the bones of the foot or ankle. It should also to the minimum level of pain or discomfort you are able to tolerate.
For much more information on this, listen to DON'T ICE THAT ANKLE.
Training Tip #76 - Bench Press ...
When performing a barbell bench press, make sure the bar is parallel to any ceiling tiles or beams that are directly over the bench.
If the bar is not in alignment with anything above it, your body and mind will automatically adjust your bar path during the movement ... which will ultimately hurt your form, steal your gains, and possibly leave you injured.

Training Tip #75 - Loaded Carries ...
To make loaded carries more challenging, add in some "pauses" along the way.
Not only will it increase the time under tension, it will also work on your stabilizers and improve your ability to deccelerate.

Training Tip #74 - Deadlifts ...
When performing deadlifts with a trap bar, try to align your feet in the same position you would on Tip #73.
Given there is no bar running through the middle of a hex bar, the best way to do this is to imagine there is a barbell running straight across from one sleeve to the other (similar to the red line drawn below)

Training Tip #73 - Deadlifts ...
When performing deadlifts with a barbell, you can figure out the right distance you should be from the barbell based on what you have to do with the weight before you move it.
- If you have to roll it in --> you are too far
- If you have to roll it out --> you are too close.
A good starting point for everyone is to try to align the knuckle of your big toe under the bar.
You can then make gradual adjustments based on the notes above.
Note ... not everyone has the same dimensions / mobility ... so this is a good starting point. Minor adjustments should be made each session as your continue to improve your mobility and technique.

Training Tip #72 - Bracing ...
When performing an exercise (like the bench press, squat, deads or even sprinting), work on bracing your glutes as opposed to your core.
What is the best way to brace your glutes?
Drive your big toe into the ground as you perform the concentric portion of the lift.

BONUS TIP: Lift you big toe off the ground on the eccentric portion of the lift, which will prime it to drive into the ground more effectively on the concentric portion.
Training Tip #71 - Jumping ...
When performing training that involves explosive jumping movements, shake your legs in-between your sets while you are resting.

BONUS TIP: Never make an explosive jump session a conditioning session. Keep your sets to 2-3 reps and get a full recovery (while shaking your legs) in between each set.
Training Tip #70 - Deadlift ...
When setting up for the deadlift, push the outside of your knees out so they are touching your forearms.

By moving your knees out, you create torque in the hips and a nice platform to drive your feet into the floor and the weight away from it.
Training Tip #69 - Deadlift ...
How wide should your legs be when performing a trap bar deadlift?
Our recommendation is to go slightly wider than you would on a traditional barbell deadlift (see Tip #68)

Why?
Depending on the type of trap bar you have, the handles on the trap bar may force your arms to go out wider than they normally do on a barbell. To ensure your knees can still drive into your forearms, you may need to slightly widen out your legs.
Why do your knees need to drive into your forearms?
See Tip #70
Training Tip #68 - Deadlift ...
How wide should your legs be when performing a traditional barbell deadlift?
The simplest way to get started is to perform a vertical jump and then look down at the distance of your legs when you land.

What ever that distance is, that should be your starting point for leg width on the deadlift.
Note: Starting Point does not equal Ending Point ... you can and should continue to make gradual adjustments to your leg width depending on how your body changes over time.
Training Tip #67 - Injury Rehab / Recovery ...
If you want to gradually reintroduce sprinting back into your training program after a lower body injury, start with short hill sprints on a surface with a moderate incline.

By running at a slight incline, you reduce the stress on your legs by both reducing the distance your lead foot has to travel to strike the ground and by reducing eccentric forces by staying in the accelerative (forward lean) position.
Training Tip #66 - Nutrition ...
If you want to shed body fat, follow these two magic words ... "CHEW SLOWLY".

Not only will this improve the way you digest what you are eating, it may help you stop eating when you need to (FEELING SATISFIED) as opposed to when you want to (FEELING FULL).
For more details, check out our blog post completely dedicated to this topic HERE.
Training Tip #65 - Tongue Placement ...
To instantly get stronger, press your tongue onto the roof of your mouth (where your gums meet your two front teeth).
Not only does it activate your core muscles and provide stability, it forces your body to remain the "Power Position" ... where your head, shoulders, hips and knees all aligned.

If you don't believe me, trying keeping your tongue on the roof of your mouth while sticking your head
out in front of your shoulders.
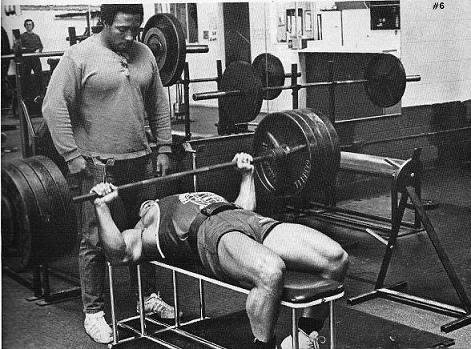
Training Tip #64 - Close Grip Bench Press ...
When performing a closed grip bench press, avoid putting your hands too close together.
Doing so will not only put excessive strain on your wrists, it will also prevent you from optimally engaging your triceps and lats during the movement.
To guarantee correct hand placement every time, make sure your elbows are touching your torso and your hands are stacked directly above your elbows.
If your hands end up inside your elbows, you are doing it wrong.
(Note: The picture below is a great example of how not to do it. Notice the hands are inside the elbows)

Training Tip #63 - Olympic Lifts ...
When performing an Olympic Lift, do not pull with your arms until the weight gets to your hips.
If you pull with your arms too early, you will not allow your body to maximize the big muscles groups required to get you into triple extension of the ankles, knees, and hips.

Training Tip #62 - Reaction
If you want to incorporate "reaction" into your training, have your athletes only execute their rep based on external cues.
The external cue can be anything
- Mirroring someone else's movement
- Chasing or being chased
- Moving after a designated cadence.
- Moving after a designated color or number is called
The video below shows an athlete performing a one arm clean, based on the cadence used by his high school football team.

Training Tip #61 - Recovery ...
If you ever feel like you tweaked a muscle after a training session, the worst thing you can possibly do is NOTHING.
Laying in bed all day will keep you out of the gym all week.
On the flip side, immediately rushing to a foam roller is not the answer either.
The fastest way to recovery is following the pyramid below, starting at the bottom and working your way to the top.

Training Tip #60 - Jumps ...
When performing a squat jump, find a target on the wall that you want your eyes to reach when you are at the top of your jump.

Not only will this provide you with a "goal" to measure your progress, it will also promote a natural triple extension of the ankles, knees, and hips as you are forced to go completely straight up to hit your target. ...(as opposed to drifting forward or backward, which will steal a few inches off of your vertical)
Training Tip #59 - Bench Press ...
When setting up for the barbell bench press, make sure your eyes are lined up directly under the bar.

A bonus benefit (for those who tend to set up too far back on the bench), this will allow to you to move the barbell on the proper path without having it hit the safety hooks.
Training Tip #58 - Hip Hinge ...
If you are struggling to maintain a flat back during the hinge portion of any form of an RDL, place a pencil under your armpit and execute the movement without letting it drop.

Holding the pencil tight to your body activates your lats and helps prevent your lower back from rounding during the descent portion of the lift.

Training Tip #57 - Single Arm Training ...
Before executing any single arm movement (such as one arm DB bench or one arm overhead lunge), do the following 3 things.
- Stick the opposite arm out to the side
- Make a fist
- Squeeze as hard as you possibly can

These things will not only help you maintain balance, they will also help your recruit the motor units necessary to stabilize the core and lift the heavy weight through the process of hyper-irridiation.
Special thanks to T-Nation for the tip and the photo.
Training Tip #56 - Hip Hinge ...
To improve your hip hinge on movements like the RDL and Good Mornings, act as if someone is pressing the front of your hips back into you as you initiate the movement.
A great way to practice this is to literally place your hands on your hip bones and manually press your hips back. If executed enough, the mind muscle connection will carry over to when you perform these movements with load such as a barbell, dumbbell and or bands.

Training Tip #55 - Nutrition ...
Eat your protein shake (as opposed to drinking it).

Not only will the process of chewing enable you to effectively digest your meal, it will also help satisfy your cravings of hunger (because you are ingesting it more slowly).
Bonus Tip: Here is the best "recipe" to "eat your protein" shake
1. Add a small amount of water to the bottom of a cereal bowl
2. Add your necessary scoops of protein
3. Mix thoroughly
4. Add water in very small amounts, stopping when powder is no longer clearly visible in the bowl.
Training Tip #54 - Sprinting ...
During the acceleration phase of a sprint, be sure to keep your foot, hips and shoulders in a straight line.

Most people will let their chest drop or "leave their hips behind", not allowing them to maximize the ground reactive forces that will let them explode out of the gate.

Training Tip #53 - Bench Press ...
When setting up for the bench press, actively pull the barbell down into the safety pins for 3-5 seconds BEFORE lifting it off the rack.
This will help you do two things.
1. Recruit the muscles needed to bench press the weight
2. Build the platform to support the weight by retracting the shoulder blades back and down.

Training Tip #52 - Recovery ...
"Leave 1 or 2 in the tank" (as per the great Joe DeFranco) ...
Put simply, don't train to failure.
If can get 10 reps, do 8.
This will not only keep you fresh and energized for the next training session, it will help your mind and body remember successfully moving weight as opposed to getting buried on your last set of bench press.

Training Tip #51 - Sprinting ...
When sprinting forward, try to drive off the inside portion of your feet ... with a special focus on utilizing your big toe and the "meaty" portions of your foot (see #3 in the image below).
By leveraging the use of those areas, you will be able to maximize your force generation into the ground (which, in turn, will propel you forward).

Training Tip #51 - Recovery ...
After a training session, hang from a pull-up bar to both reduce shoulder impingement and decompress the spine.
This will not only help reduce the risk of injury, it will also kick-start the recovery process by enabling lymphatic drainage (due to the extremities being placed over the heart)

Training Tip #50 - Performance Hack ...
When performing movements that require over 25 reps, don't breathe in and out on every rep. Instead, break your breathing down into mini-blocks to help maximize your performance.
This will
Here is an example:
- Block #1: First 8-10 reps ... (Hold Your Breath ... Take a HUGE Breath in First)
- Block #2: Second 8-10 reps ... (Breathe Out and Hold Your Breath ... Don't Stop Repping)
- Block #3: Last 5-8 reps ... (One Breath Per Rep ... a.k.a. "Singles")

Training Tip #49 - Recovery ...
After completing your training session, activate your parasympathetic nervous system and practice your nasal breathing by only breathing through your nose during your "cool down".
The easiest way to do this is to perform a series of static stretches and to hold that stretch for a total of one nasal breath ... meaning one breath in, hold it for a few seconds, and one breath out.

Training Tip #48 - Squats
When performing a back squat, don't let the barbell just rest on your shoulders. Instead, actively pull the bar into your upper back.
This not only helps you dictate the path of the bar (because it stops it from rolling off your back), it also helps you engage your lats and stabilize your core.

Training Tip #47 - RDL
When performing a Romanian Deadlift (RDL), actively pull the bar back and into the body with the lats.
This will help you maintain proper core stabilization throughout the entire range of motion of the movement.
Note: Not doing this is where most people "fail" on their RDL's. They let the arms simply hang, which in turn allows the lower back to round more easily.

Training Tip #46 - Squats ...
When setting up for the squat, make a "big fat belly" by filling your stomach with air and expanding your rib cage.

This technique will both stabilize your spine and give you a much better base of support as you perform the movement.

Training Tip #45: Strength ...
When setting up for the squat or deadlift, do not allow your foot to mush into the ground like melting ice cream.

Make a tripod with your foot by pressing the 3 parts shown below into the ground.

Not only will this build a solid foundation for your entire body, it will also enable you to drive your feet into the ground as you move the weight in the opposite direction. (Bless you Newton and your 3rd Law)

Not only will this build a solid foundation for your entire body, it will also enable you to drive your feet into the ground as you move the weight in the opposite direction. (Bless you Newton and your 3rd Law)

Training Tip #44 - Bench Press ...
Make sure your wrists and elbows remain directly under the bar or dumbbell when you bench press.
Not only does this allow for a more efficient movement, it also provides more support for the load during the entire range of motion.
Remember ... a stacked joint is a happy joint.

Training Tip #43 - The Prowler ...
When pushing The Prowler, ensure you are "pushing" the ground behind you as opposed to pounding your feet straight into the ground.
To achieve this, think about punching your knees forward throughout the movement.
You know you are doing it right if your front shin is low to the ground and your back leg is extended.

Training Tip #42 - Pull-Ups ...
On your last rep of a pull-up, don't free fall to the ground like you are on the Tower of Terror (see Training Tip #38).
Rather, lower yourself to the ground as slowly as possible.
This will not only increase your total time under tension, it will also help you capitalize on your body's ability to accept (eccentric portion) more load or tension than it can overcome (concentric portion).
Training Tip #41 - Mirrors ...
Do not look in the mirror while executing a lift in the gym, as it can be a source of distraction when trying to focus on muscle activation and contraction during a movement.
In addition, it could negatively impact your form if your head shifts along with your eye gaze during a range of motion.
 |
| Mirrors Should Be Reserved for Flexing Only |
For those of you who believe you need to look in the mirror to ensure your form is correct, check out this quick note from T-Nation.
"Whenever you use the mirror, the image from the mirror reflects back to your retina and gets processed by your occipital lobe before the brain cognitively compares this image with the desired outcome, which requires further processing.
If you use the mirror to make corrections, by the time you've made the adjustments, the error has already transpired" - T-Nation
Training Tip #40 - Lat Pulldowns
When performing a lat pulldown, pull the bar to your sternum as opposed to your clavicle or your stomach. If the bar ends up at your belly button, you made a wrong turn somewhere in the gym and in life.

The best way to repeatedly make this happen is to make a HUGE chest before pulling the bar down, and then simultaneously try to drive that HUGE chest into the bar as you pull it down from the top of the rack.

Bonus Tip - When the rep is complete, don't let the bar slingshot back to the top of the rack. Control the bar so you are owning it up and down. (Or ... just follow Training Tip #38)
Training Tip #39 - Stretching ...
When performing a static stretch, try to remain as comfortable and relaxed as possible. For most athletes, the real goal of stretching is to speed up muscle recovery and improve flexibility.
The more strain you put on yourself during a static stretch, the less this will actually happen.

Training Tip #38 - Own the Movement ...
When performing the bench press, "Own the Movement" of the barbell.

"Own the Movement" is a fancy way of saying control the barbell during both the up and down phase of an exercise.
The descent of your bench press shouldn't look like something out of Disney's Tower of Terror.

This same concept can be applied to almost any other movement including squat, RDL's, dips, and even the dreaded bicep curl.
Training Tip #37 - Deadlifts
One of the best mental cues to help you drive your feet through the ground on the deadlift is to visualize making a footprint with your heel on the floor as you begin to pull the weight off the floor.

This should not be confused with the poem "Footprints in the Sand", but it could be just as helpful.

Training Tip #36 - Squats
When performing a barbell back squat, make sure your wrists are facing directly forward and your elbows are under your shoulders.

If your wrists are angled down towards the floor and your elbows flare backwards, your upper body will lean too far forward. The end result is usually a disengagement of your upper back and a rounding of your lower back.

Training Tip #35 - Deadlift ...
Your shins should be in the vertical position prior to moving the weight on your deadlift. If your shins have too much of a forward angle, it will force your shoulders to go over the bar and prevent you from pulling the bar back into your body at a 45 degree angle. (See Training Tip #7)
Training Tip #34 - Olympic Lifts
When performing "Olympic Lifts" like the clean or snatch, move your body into a position like the bow of a "bow and arrow".

This will enable a better pull into triple extension (Ankles-Knees-Hips) during the movement.

Training Tip #33 - Sumo Deadlift ...
When setting up for the sumo deadlift, ensure that your feet are NOT too wide.
If you cannot jump out of your bottom position, you need to tighten up your stance.

Training Tip #32 - Grip ...

After completing your last rep on your last set of max effort deadlifts, do not immediately place the barbell on the floor. Rather, hold the bar for as long as possible in order to build your grip strength.
Note: Do not do this on any other rep, as it will fatigue your hands and negatively impact the remainder of your max effort deadlift session.
Note: Do not do this on any other rep, as it will fatigue your hands and negatively impact the remainder of your max effort deadlift session.
 |
Training Tip #31 - Bench Press ...
During the upward movement on the bench press, think about pushing yourself away from the bar as opposed to pushing the bar away from you.
This mental cue helps recruit the lats and triceps more, which in turn, enables a bigger bench press.
Training Tip #30 - Broad Jump (The Standing Long Jump)

When performing the broad jump, try to achieve a Take Off Angle of approximately 25 degrees from the floor.

If your angle is much higher (above 30 degrees), you will sacrifice distance for height.
If your angle is much lower (below 20 degrees), your feet will hit the ground well before your momentum has stopped.
Training Tip #29 - Reverse Lunges
During a reverse lunge, ensure the majority of weight remains on the front leg.
If you can hear your rear foot touching the ground, your weight has shifted back too far.

Training Tip #28 - Bench
In order to ensure you get the tightest grip possible on the bench press, squeeze with your pinkies first ... working your way all the way back to your thumbs and pointer fingers.
Doing so will guarantee that your entire hand is "breaking the bar".
If you are not "breaking the bar", don't even bother to un-rack the weight.

Training Tip #27 - Squat
Before you even think about taking the weight off the rack for a back squat, be sure to drive your neck (aka - "Pack Your Neck") into the barbell.
When you "pack your neck", you automatically engage your upper back and chest, which in turn, creates a very nice shelf for supporting the weight during your movement.

Training Tip #26 - Bench
When performing the bench press, never let your elbows go past the back of your torso as you are lowering the weight.
Not only will it put excessive strain on your shoulders, it will move you out the "braced" position required to move optimal weight.

Training Tip #25 - Deadlift ...
When setting up for the deadlift, never let your shoulders drift too far over the barbell.
Doing so will force you to pull the bar up, as opposed to the optimal 45 degree angle which was explained in Training Tip #7.
 |
| Shoulders are too far over the bar. |
Rather, you should start your set-up by having your shoulders behind the barbell.
 |
| Shoulders behind the bar |
Why?
Take a guess ...

Training Tip #24 - Bench
When performing the bench press, try to drive your heels into the ground as you move the weight up.
By doing so, you will drive your lats back into the bench - giving yourself a nice platform from which to push "yourself away from the weight".

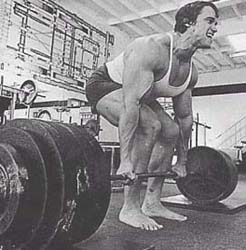
Training Tip #23 - Deadlift
When performing the Deadlift, never start the movement by trying to pull the bar off the floor with your arms.
Rather, you should take advantage of Newton's 3rd Law and initiate the movement by pushing your feet through the ground - which will force your lower body to become heavily involved.
Even if your arms are as big as the guy's below, they will never be strong enough to pull massive weight on their own.
"For every action, there is an equal and opposite reaction"
- Newton's 3rd Law of Motion

Training Tip #22 - Knees
This mental cue will help keep the knee out of its weaker "valgus" position, where the knee is turns in laterally. (see the first image)
 |
| BAD - Knee Turned In (Valgus) |
 |
| GOOD - Knee Pushed Out |
As a coach or athlete, make sure this mental cue is constantly reinforced.
Training Tip #21 - Curls
When performing barbell curls, never let the bar simply fall back to the starting position.
Instead, actively pull the barbell back down as if you were trying to flex your triceps.
This will help you work both your agonist muscles (biceps) and antagonist muscles (triceps) during the same lift.

Training Tip #20 - Bench
As you lower the barbell during bench press, actively try to reach up with your chest in order to "meet" the bar on its way down.
Not only does this shorten your range of motion, it also forces you to pull your elbows in and tighten your glutes - both of which help optimize your pressing power.
Training Tip #19 - Recovery
When foam rolling, do not move over the roller back and forth at lightning speed (as if you were rolling out pizza dough).

To optimize your session, make an effort to roll slowly from one end of a body segment to the other. (See Tip #18)
What does "slowly" mean?
An example of "slowly" would be taking 20 seconds to roll from just below your hip to just above your knee.

Training Tip #17 - Nutrition


As you lower the barbell during bench press, actively try to reach up with your chest in order to "meet" the bar on its way down.
Not only does this shorten your range of motion, it also forces you to pull your elbows in and tighten your glutes - both of which help optimize your pressing power.
Training Tip #19 - Recovery
When foam rolling, do not move over the roller back and forth at lightning speed (as if you were rolling out pizza dough).

To optimize your session, make an effort to roll slowly from one end of a body segment to the other. (See Tip #18)
What does "slowly" mean?
An example of "slowly" would be taking 20 seconds to roll from just below your hip to just above your knee.
Training Tip #18 - Recovery
When foam rolling, break your session into mini-segments such as the following:
- from the shoulders to the hips
- from the hips to the knees
- from the calves to the ankle
Not only will it help you flush the "kinks" out, it will prevent you from having the roller move over your joints (hips, knees, ankles) - which will cause more harm then good.

Training Tip #17 - Nutrition
Try not to go to bed on an empty stomach.
Training Tip #16 - Squat
Not only will it slow down muscle growth and recovery, it could also impact sleep quality to the point you wake up feeling exhausted.
Your best bet is to have a small amount of slow digesting protein like turkey or chicken.
 |
| This is not a small amount |
If whole foods are not available, consume a protein supplement that is mostly composed of casein protein as opposed to whey.
Training Tip #16 - Squat
When performing a front squat, try to push your elbows up as you descend down.
By pushing the elbows up, your chest and upper middle back brace tight enough to create the perfect "shelf" to support the weight throughout your movement.
An added bonus is that it enables you to easily lead up with your chest as you come out of the hole. (see Training Tip #10)

Training Tip #15 - Bench ...
Do not be in a rush to lower the bar after you un-rack it during barbell bench press.
Rather, ensure the barbell (and your entire body) are completely stabilized before you move an inch.
This should be done with your arms extended, your shoulders retracted, and our lower back arched.
After a full "one one-thousand" count in this position, you can then begin to lower the barbell.

Training Tip #14 - Technique ...
When holding a dumbbell, grab it so that the knuckle of your thumb and the outside of your pointer finger touch the bottom of the lowest plate. (As seen in the photo below.)
This will allow you to control the dumbbell more easily and move heavier weight.
 |
Training Tip #13 - Program Design
Perform explosive movements (like jumps and plyometrics) at the earlier part of your training session.
If you wait until the end, you may be too fatigued to generate the maximum force necessary to optimize these movements.
Remember F = ma.
If "a" is small, so is F.
Training Tip #12 - Nutrition
Contrary to the popular belief that you need a 100% protein shake right after your training session, I recommend you drink something with a 4:1 ratio of carbohydrates to protein. This ratio will allow insulin to quickly drive high concentrations of nutrients deep into your muscle cell.
Contrary to the popular belief that you need a 100% protein shake right after your training session, I recommend you drink something with a 4:1 ratio of carbohydrates to protein. This ratio will allow insulin to quickly drive high concentrations of nutrients deep into your muscle cell.
(Please make sure you check with your physician before making changes to your current diet.)
If you trust supplements, I recommend you drink Surge Recovery from Biotest.

If you do not trust supplements, I recommend you drink organic chocolate milk.

Training Tip #11 - Speed
When training for speed, stop the session as soon as you begin to feel fatigued.
The more fatigued you get, the more your form will begin to degrade and the less your body will explode into action.
Don't worry, this does not make you SOFT.
There is a time for conditioning and it is NOT during speed training.

Training Tip #10 - Squat ...
As you come out of the hole on your squat, think about leading up with your chest first.
Not only will this stop you from falling forward, it will force you to push your feet through the ground on the way up. (This tip links perfectly with Training Tip #8)

Training Tip #9 - Bench
As you lower the bar during bench press, think about pulling your elbows into your torso.
This will prevent you from flaring your elbows and tearing a hole through one of your shoulders.
 |
| Nick King's Warm-Up Set |
Training Tip #8 - Squat
Try to spread the floor with your feet as you come out of the base of your squat.
This will ensure that you activate your glutes and push off the ground properly.
"For every action, there is an equal and opposite reaction"
- Newton's 3rd Law of Motion
Training Tip #7 - Deadlift
When performing a deadlift, visualize that you are trying to pull the barbell back at you at a 45 degree angle, as opposed to pulling it straight off the ground.
This will force you to keep your shoulders behind the bar on your set-up, as well as make you put more emphasis on driving your feet through the ground as you start your movement.
Training Tip #6 - Pull-Ups
When performing a pull-up, focus more on pulling yourself up with your elbows than with your hands.
This focus will automatically trigger your lats and help get you a few extra reps - which may help you get as jacked as the guy in the picture below.
Training Tip #5 - Squats ...
When performing a squat, never look down. (This even includes when you are walking out of the rack or setting up your stance.) As soon as you look down, you lose the position in your upper body required to properly brace yourself under the load of the bar.
Training Tip #4 - Chin-Ups
When performing a chin-up, focus more on bringing your chest to the bar as opposed to bringing your chin over the bar. This will prevent you from hyperextending your neck, which in turn, will keep you free from a great deal of neck pain.
Training Tip #3 - Push-Ups ...
When performing a push-up, make sure the inside of your arm is actually touching your torso. Imagine putting a piece of paper under your arm and not letting it fall out.
Don't look like this guy ...
Training Tip #2 - Curls ...
When performing curls with a barbell, keep your elbows tucked in tight and your hands out at a 45 degree angle from your body. This will reduce the stress that is normally felt when your hands are directly in line with your elbows.

Training Tip #1 - Rows
When performing a seated row, focus on pulling your elbows back and down as you move the weight towards your body.
No comments:
Post a Comment